Wednesday, November 21, 2012

Goodwill Lamp Transformed

I finally found a lamp for my living room at Goodwill a few weeks ago. I was looking for a cheap lamp that I could spruce up, so that I can get rid of my ugly torchiere floor lamp.  Here it is before. Ugly brass, but with great curves.

 
I wrapped up the electrical parts in some aluminum foil and painters tape and primed the base on one of the few sunny days we've had here lately. 

I originally painted it with a silver metallic spray paint, but didn't like the way it looked.  I actually liked the white primer better than that!  So I primed again, and finished with a few coats of Rust-Oleum's Heirloom White.  Here's the new lamp in my living room.  The linen drum shade was on sale at Fred Meyer.  I've seen some great painted shades on Pinterest so I may attempt that someday.


Linking up to:
 

TDC Before and After

Friday, November 16, 2012

The Table From H-E-Double Hockeysticks

With this table redo, I finally just had to put the paint brush down and call it done.  I'll get to why it is the table from HELL in just a moment.

My sister got this table at a thrift store for $5 (and I think it was another 20% off). It's real low - too low if you ask me - but for $5, I figured it was good enough for a revamp project. It was another one that sat in my guest room for a few months while I tried to get some inspiration. I finally decided to fix it up and give it to my sis for her birthday so I wanted to paint it cream with a black top to tie into her black coffee table. Here's the before pictures.


I actually tried to pry off that diamond shaped detailing around the legs but had no such luck.  That was the first of the obstacles.  In order to paint the base and top different colors, I spray painted the base cream first and let that dry.  I then used black garbage bags to tape off the base so that just the top was visible and painted that black. 


Sounds easy enough right?  Wrong.  Most of my problems stemmed from not letting the paint cure long enough before moving on to another step.  I found finger prints in the paint from moving the table from outside where I was painting to inside out of the impending rain.  I chipped the paint on the sliding door bringing it in at one point.  I ran out of black paint and had to wait a few days until it was nice enough to paint outside again.  Ugh...I felt like I was never going to get it done! 
 
I also had to add wood filler to the existing holes for the hardware, since I didn't want to use the original and my new pull needed different holes drilled.
 
 
There are still spots that I should really touch up, but I am calling it good on this one. My sister can use it until she gets tired of it, and then she can throw it out. ;)


Thursday, November 8, 2012

Living Room Updates

 I FINALLY have possession of my new pillows so I wanted to share the pictures of my new sofa!  Way-back-when I posted that I decided on updating my living room in greys, navy and coral.  I ordered a sofa from a company called Stanton, spray painted a vase navy blue, made over an old cane chair, and made some art on a budget.  Here are some pics of my new room!


I went with a neutral warm grey fabric for the sofa so that I can easily transition it into other looks if/when I get tired of the navy and coral. I’m loving this color combo though, so hopefully I can stick with it for a while!


 I absolutely love my pillows that I ordered from a company called Rowe.  They are a manufacturer that we sell at the furniture store I work at and they have the cutest fabrics!  My sofa was very reasonably priced, so I decided to splurge on the pillows because they add so much to the overall look. 


My other new addition is this TV console that I got for a steal. Our store bought it on closeout from the manufacturer, so it was already marked way down below the original retail price and I used my employee discount to save even more $$! It resembles something you would find at Pottery Barn, which I’m finding is very much my style. I love everything about it, from the curvy legs, to the bin cup drawer pulls, to the wicker bottom shelf, to the red mahogany color and slight distressing. 


The baskets were a Fred Meyer find (on sale and purchased with a coupon, of course) and are a perfect size for my DVD collection.  The console also ties in really well with my two tone table.


I'm loving how it is all coming together! It will be ever changing I'm sure. Currently, I'm working on a Goodwill lamp makeover so that I can get rid of that ugly torchiere and am on the hunt for another end table. 

Thursday, November 1, 2012

Deals on Area Rugs

If any of you out there need an area rug, I've got some great finds for you!  First, go to rugsusa.com and search through their inventory of thousands of rugs in all different styles.  After you've found one you can't live without, go to groupon.com and look for the RugsUSA deal.  You can buy a groupon for $120 worth of RugsUSA products (area rugs, lamps, furniture) for $55, $170 worth for $75 or $235 worth for $95!  Those are savings of 54%-60%!  There are only a couple of days left to buy this deal, but it doesn't expire until February 2013. 

Now before you go purchase your rug, go to http://www.couponchief.com/rugsusa and find a coupon that would apply to your order.  If I were to buy one, I would use "FD2K1130" and get 30% off this rug that is originally $159 (which is already a great price for a 100% wool rug).  I would only end up paying $55 for it!  Unfortunately, I can't make up my mind on a rug for my living room, so for now I will do without. 

But I am quite tempted by this one.

Source

Lesson Learned

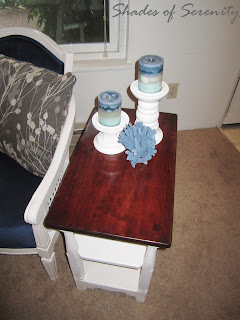
 A while back, I gave this little table a makeover. I mentioned that the top was pretty blotchy after my staining job. It bugged me everytime I looked at it, so I decided to restain the top.  This is the table top before restaining.  It looked BAD. 

 
The problem was that I didn't sand enough before adding the new stain. So for the second round, I sanded it down to the bare wood and then sanded some more, just to be sure.
 
 
I added the prestain wood conditioner, let that soak in according to the directions on the can, and then wiped off the excess.  Next I added the stain.  I used cloth sponges this time instead of a foam brush.  After two coats of stain, the table looks SO much better. 


So, lesson learned.  The key is to sand ALL of the previous finish off (whether it be stain, clear coat or paint) prior to applying any new stain which is unfortunate because I hate sanding!