Thursday, November 1, 2012

Lesson Learned

 A while back, I gave this little table a makeover. I mentioned that the top was pretty blotchy after my staining job. It bugged me everytime I looked at it, so I decided to restain the top.  This is the table top before restaining.  It looked BAD. 

 
The problem was that I didn't sand enough before adding the new stain. So for the second round, I sanded it down to the bare wood and then sanded some more, just to be sure.
 
 
I added the prestain wood conditioner, let that soak in according to the directions on the can, and then wiped off the excess.  Next I added the stain.  I used cloth sponges this time instead of a foam brush.  After two coats of stain, the table looks SO much better. 


So, lesson learned.  The key is to sand ALL of the previous finish off (whether it be stain, clear coat or paint) prior to applying any new stain which is unfortunate because I hate sanding!

Thursday, October 25, 2012

Homemade Cat Napper

A few months ago I sold my loveseat on Craigslist because I had ordered my new sofa and knew that I wanted an accent chair or two instead of a matching loveseat.  My cats were depressed because their fave spot for napping was on the back of that loveseat that sat right in front of the window.  (Ok, so maybe I imagined them being depressed when they actually just found other spots to nap.)  You can see how much Stapler loves to look out the window in this picture. It's blurry, but she is sitting on top of the pillow with her head laying on the wood frame. Not very comfy. I also had to put a blanket on the chair since they spent alot of time laying here before they got their new perch.


So I had been on the lookout for a cat tree or some sort of napper to put in front of the window to give them a comfy place to rest again and get them out of my chair.

I don't know if you've ever shopped for cat tree, but let me just tell you, they are EXPENSIVE!  Even for something about 4' tall, they start around $80.  I found these little guys on Petco.com and thought that something like that would be perfect because I didn't want them to be a huge eyesore or obstruction in my living room. But, I wasn't about to pay $150 for two of them! 

Source
So I got to thinking and looking around my house for inspiration to build something similar and came across these end tables that I bought during college for about $50 for the pair. 


I was planning on taking them to Goodwill, but just hadn't gotten around to it. At first, I thought about taking the tops off the tables and building a hammock of sorts in each using netting, batting and fabric. After thinking a little harder about that, I realized that may not hold up to the weight of Precious (bless her heart).  So I decided to leave the tops on and just add lots of padding to make it a softer bed for them.  I had some left over spray paint and fabric from my cane chair project, so I used those to transform the Goodwill bound end tables into something functional that the kitty girls love! 


 After adding carpet samples for scratching and a hanging mouse toy, I have been able to convince them out of my chair and onto their new napper (for the most part). 


Linking to:

HouseofHepworths

TDC Before and After
Photobucket

Monday, October 15, 2012

Cane Chair Makeover - Reveal

During that week of having no computer access at home, I also finished up my chair makeover.  Remember this beast?


Ugly, right?! Right. But when I saw it at the thrift store, I actually fell in love and knew it had potential.  I hauled it home and started the demo right away.  Unfortunately, because of the computer crash, I lost all of the pictures I took of the beginning of the process.  I will try to explain the steps though, in case any of you want to tackle your own reupholstering project.  (It's fun and pretty easy I promise!)

First, I pulled the foam out of the removable cushion and was happy to find it in decent condition.  Foam is expensive and I didn't want to have to buy a new cushion core so I reused this one. 

Then I turned the chair over and unscrewed the seat frame from the chair frame.  I pulled off all the fabric and old batting.  This step requires some good needle nose pliers, a flathead screwdriver, and a hammer for pulling out old staples.  I also ripped off the cording around the back of the chair and pulled off the fabric, batting, foam and chipboard.  I saved the foam from the back as well.

The next step was giving the chair a coat of primer.  I wanted to spray paint the chair so I used spray primer, too. The key to spray painting is to do many light coats instead of a few heavy coats (you'll avoid drips this way).
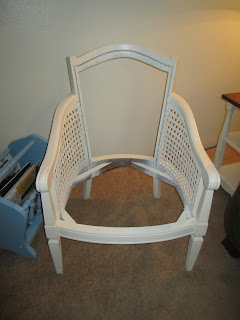

 After the primer was dry, I began the process of painting.   I chose to use Rust-oleum's Heirloom White that I got at Home Depot.   I had to do several coats to make sure I got in all the nooks and crannies of the caning and detail on the frame.  I recommend letting your paint cure for several days before attempting to reassemble your chair.  Otherwise you will end up chipping the paint, like I did. 


Now it was time to reupholster the chair.  First I used batting to fill the holes from the tufting in the existing foam. 

I used the foam to make a stencil on the fabric, cut that out and stapled it on to the back of the chair.  I also used the pattern to cut out some new batting and cardboard to give the back some more rigidity. 
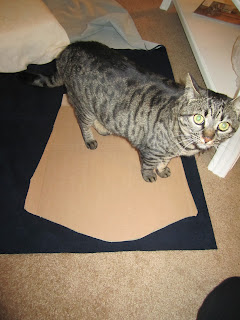


Precious was oh so helpful during this step.
 Here you can see how I layered the components.  The fabric is stapled facing the back of the chair, then batting, then cardboard, then the foam.  I added one more layer of batting and then put the fabric on top and stapled it all down making sure to pull tight and get rid of all the wrinkles.  This was probably the most challenging part because I kept getting too close to the inside edge and my staples would go through the frame and poke out the backside.  I ended up having to touch up a few spots with some paint.


I did basically the same thing with the seat cushion.  Foam, batting and then fabric and stapled all that to the frame.  The original chair had a removable seat cushion, but I am not that advanced on the sewing machine yet, so I just put the original foam right on top of the springs and stapled it all together.


I reattached the seat to the chair frame and it started to look like a chair again!  Next I attached mdouble cord welting with some hot glue to the back of the frame to hide my staples.  I also added it between the seat cushion and the chair frame to finish it off.  I explained the sewing process in this post.


And after a few paint touch ups, she was all done! What do you think of the transformation? I love it!  


I've linked this post to:
TDC Before and After

Tuesday, October 9, 2012

Zebra Print Table


Wow...it has been a while since I've posted!  My computer (well Mark's computer that I have been using) crashed on me so I haven't been able to access the internet at home except for on my phone.  I finally have a new laptop so I can fill you in on all the happenings around here. 


My living room is coming along nicely!  My new sofa was delivered last week, but the pillows (which are the best part) aren't here yet so I don't want to post pics of that quite yet.  I have had lots of time to work on projects since I haven't been preoccupied with Facebook, Pinterest, and whatever else it is that takes up so much of my time.  The first that I will share is the makeover of this table that my mom bought me from a garage sale.  It was in terrible shape, but had really pretty, delicate lines.  I actually wondered if it was an antique because of those lion head pulls and matching numbers on the drawers and table frame, but I couldn't find anything about it online so I figured I would go ahead and paint it.  Hopefully I didn't just destroy a valuable piece!


The table actually sat in my guest room for several months because I couldn't decide what to do with it. It seemed daunting because of the shape it was in. I ended up sanding it down, filling some dents with wood filler and priming it before I even decided what color to paint it. 


I finally decided that because it is so delicate looking, it had to have some pink on it somewhere, but I didn't want the whole table pink. Because I'm doing coral and navy in my living room, I chose to paint just the bottom 5 inches or so of the legs coral to give the illusion of being dipped in paint. Then I was inspired by a chest I found online to paint the drawers zebra print. If you know me, you know I am usually not into animal prints, but I thought this table could use a little something special on the drawers.  I also replaced those lion head pulls with more contemporary glass knobs.  (You also get a sneak peak at my sofa in these pics!)


I actually love the way this little table turned out, but I may end up selling it eventually.


Here's one last before and after. 


Linking to:
 
TDC Before and After

Tuesday, September 18, 2012

Cane Chair Makeover - Part 1


About a month ago, I spotted this chair at the ReStore in town.  


I can honestly say it was love at first sight.  I immediately started transforming it into something more contemporary and beautiful in my mind.  After several minutes contemplating the possibilities, I came to my senses and realized I had NO idea how to reupholster a chair this complicated.  I left that day empty handed and with a sad heart.

A few weeks later, while browsing Pinterest, I came across some very similar chairs that people had redone.  Some of the blogs had step by step instructions on how to reupholster a chair this style.  I initially thought I would be in over my head because this chair has a separate seat cushion that is fully upholstered and the cording around the edges, which I had no idea how to do.  However, I decided to go back to the ReStore, just to see if the chair was still there and take another look.  And guess what!?  The chair WAS still there and was marked down another 25%!  I couldn't resist.  That chair was coming home with me, even if I did have to tie it to my trunk to keep it from falling out on the way. 


My other score this week was a box of power tools I found at a garage sale for 30 bucks!  I almost bought a power screwdriver the day before at Home Depot to take the seat off this chair, so I'm glad I waited!  I will most definitely be getting good use out of these in the future and feeling very self sufficient in the process.


So, with my drill in hand I started the process of turning this beast into a beauty a few days ago and am loving it so far.  While I anxiously wait for my fabric to arrive, I have been busy looking at all of the transformations I can find online.  Here are some of my faves!  Be sure to visit their blogs to see the before pictures.  Their makeovers are pretty impressive!

Source
Source
Source
Source
Source

I am so excited to see how my chair turns out and to show you all!  So stay tuned for the finished product!